Connected Devices
For my final project, I continued developing my infinity mirror control platform. The platform includes a node + express application served from the onboard raspberry pi accessible on the local wifi network via mobile or desktop browser which allows for local video playback on the mirror as well as for downloading new video content from a node + express glitch server. The rasberry pi also runs a udp client which can receive live graphics via wifi or ethernet from a processing server which can stream graphics from any ios application which can send syphon content.
Before starting connected devices, I had some very specific knowledge of rest apis but had never worked with bluetooth, javascript, syphon, node, express, or the udp protocol.

Mobile / Desktop App
When the raspberry pi is booted up, it runs a script which starts the local node + express server written in javascript. When the program first runs, it triggers a text scrolling script built into the hzeller rpi-rgb-led-matrix library directing the user to the ip address where they can access the mirror control app on their desktop or mobile device.
Once the user connects to the mirror, the message script is killed and they are shown a screen which displays all of the infinity mirror videos stored locally on the raspberry pi. The user has the ability to preview a video, play, and stop a video on the mirror. In addition to local playback, there is a button which triggers a request to a cloud glitch node + express server which sends back a list of all of the gifs available in the cloud database . Any clips not already stored on the raspberry pi have a button that downloads them. Once a new video is downloaded, the user can play it on the mirror.


Logging
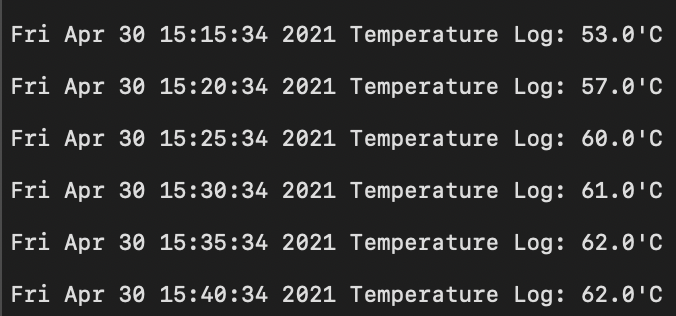
In order to confirm that the infinity mirror is functioning properly, I wrote a python script that checks the CPU temperature every five minutes and logs the data to a file. This program runs on startup through the rc.local file. I also created logs that track each command that is sent to the mirror control application.
I was having an issue with the pi networking going into power saving mode which prevented me from ssh or pinging it after 20 or so minutes in an idle state. The logging allowed me to confirm that the issue was not related to the code but a setting that I needed to adjust. I added the line “iwconfig wlan0 power off” to the etc/rc.local file which turns off power saving mode so the pi can be accessed after being turned on for extended durations. The longest I was able to run my application for was 3 days before turning it off to debug wifi connection issues.
Logging allowed me to confirm that the Raspberry Pi is overheating when running live visuals via wifi. I still need to test if this is the case at a lower frame rate. I needed to refresh the screens at 100Hz to remove the flicker when filming at a shutter speed of 50. The Pi never reached the temperature at which the CPU gets throttled (80 C) but I have noticed reduced performance of the wifi udp server after extended periods of sending live visuals.


Midterm: Rasberry Pi Wifi Provisioning VIA Bluetooth

My thesis project is going to be a series of video infinity mirrors consisting of curved led matrix panels controlled by a raspberry pi. In the long term I hope to develop a hardware and software platform which allows the infinity mirrors to access updated content from the web. This means that I need the end user to be able to connect their embedded Raspberry Pi to the internet. To accomplish that, I built a python application which activates the Raspberry Pi as a BLE peripheral allowing for the wifi configuration to be updated and the RPi rebooted.
The peripheral has a service with the following characteristics:
Read if the RPi is currently connected to the internet
Enter a new Wifi Name (SSID)
Enter a new Wifi Password
Write the new Wifi Password to the wpa_supplicant file and reboots the Pi
I started the project by looking around for a readable BLE library for the Raspberry Pi, luckily I came across a blog by Andy Lee which describes his implementation of a RPi BLE controlled espresso machine. His code contained an interface to set up a BLE peripheral using the BlueZ library. His blog post can do a better job explaining than I can but to sum up, you have to get a reference to the system dbus (middleware that allows programs to communicate between processes), then power on our BLE adapter by using a BlueZ object that implements the GattManager1 interface (Gatt is an acronym for generic attribute profile that defines the way two BLE devices transfer data back and forth using services and characteristics). After the adapter is on, we set up the advertisement for the device and add the service and characteristics. Next we create an application on the dbus, add the service to it, and register the application. Now BlueZ knows about the advertisement services and characteristics and allows centrals to connect. Detailed code for the setup processes can be found on my github. Below are some details about how my individual characteristics work.

A class that creates shared parameters and methods between the BLE characteristics. Create wifi config opens the wpa_supplicant file, writes the new wifi name and password to the end of it and saves it. Then the raspberry pi reboots itself allowing it to connect to the new wifi. Connection details can be read from another characteristics.
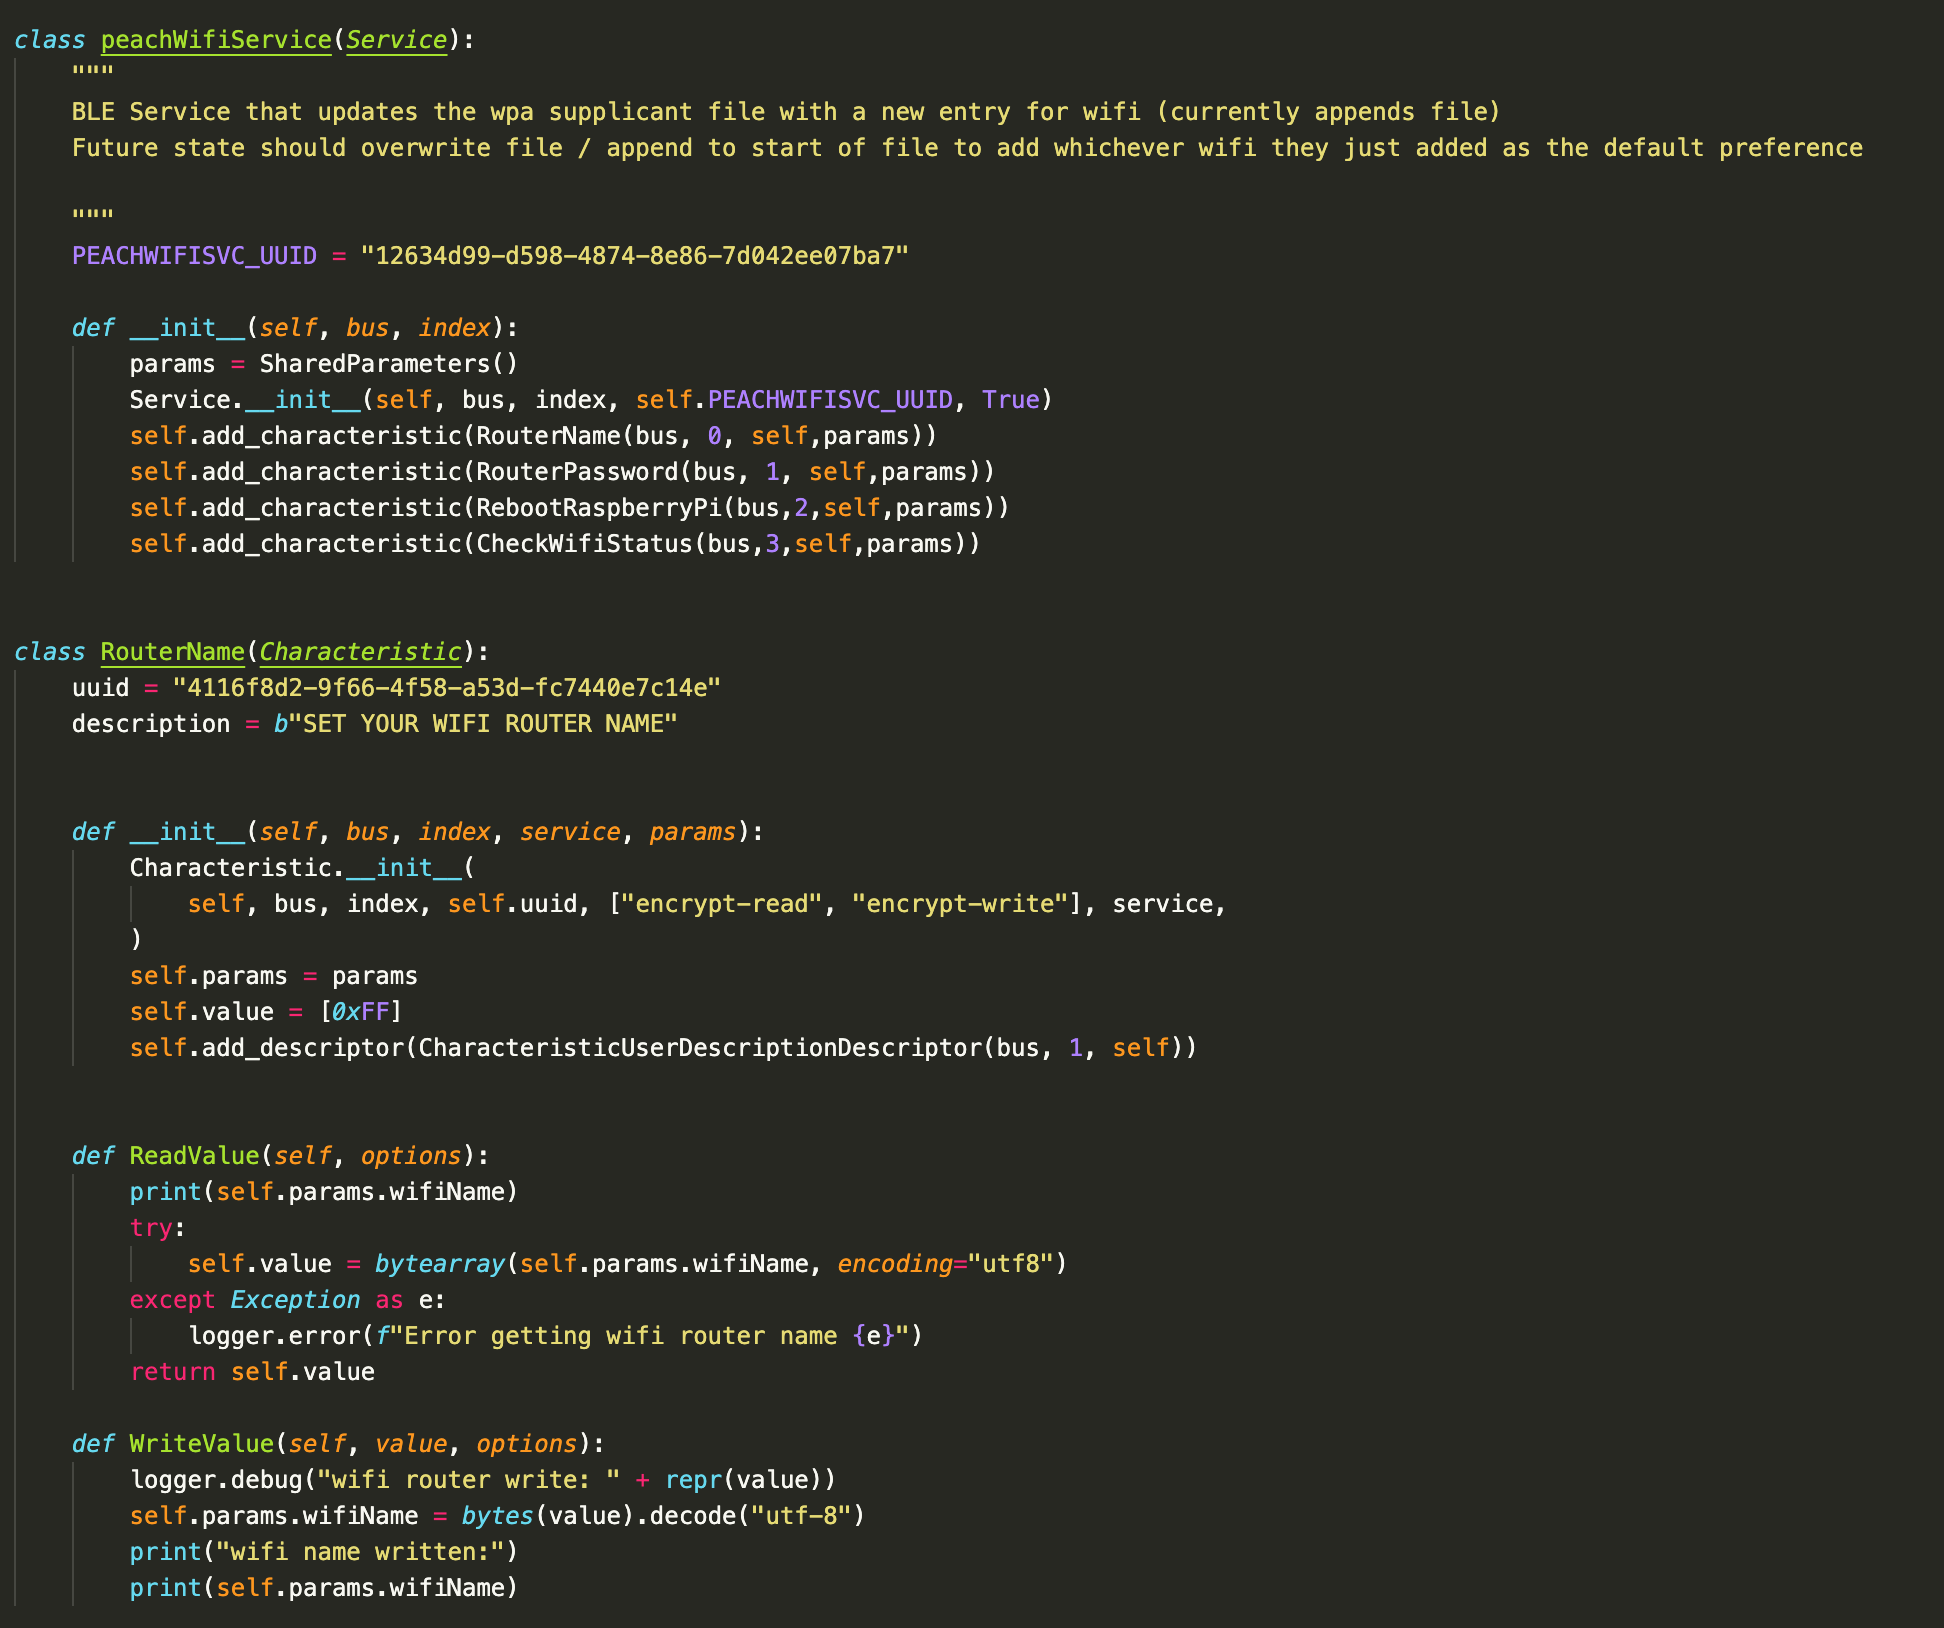
Here the service is created and the 4 characteristics are added (with their shared variables and methods), you can see the router name characteristic sends back the shared wifi name (or input wifi name to start) on read and allows you to write to the shared wifiName parameter when written.

Throughout the process of writing this peripheral, I ran into many unexpected roadblocks. The first was that my phone could only connect to the peripheral for a second before disconnecting itself. It seems to be an ios / bluez bug which eventually was fixed by removing configurations related to creating agents. Strangely, I could only connect for a second before disconnecting on bluesee on my laptop (with the M1 processor and Big Sur). The M1 problem continued to be a problem after I wrote a html/css/javascript app that is hosted on github pages which works fine on my desktop (https://aidanlincolnn.github.io/connectedDevices). The code is similar to last week’s application connecting to an arduino with some differences. Some googling makes it appear that Apple has admitted that it botched the M1 bluetooth rollout.
After the BLE device is connected I read all of the characteristics and print them to the console. The wifi status characteristic is used on the main index page to display the current wifi connected status (if it is connected, you probably shouldn’t be adding a new wifi credential to your wpa_supplicant).
The index page has fields to enter the wifi name and password and submit. The update button has a listener that calls the save and reboot function. Here, the wifi name and wifi password characteristics are written to as well as the update and reboot characteristics which triggers appending the wpa_supplicant and rebooting the Pi.
I ran into issues with the P5 bluetooth library which was sending empty byte arrays to the dbus. After a while debugging my code I realized that the issue was in the p5.ble library. The write method encodes using Uint8Array.of which only accepts numbers not strings. I was able to debug what the correct formatting was from debugs on the Pi while sending writes from bluesee and figure out that the TextEncoder object could create a properly formatted utf-8 byte array from a string.

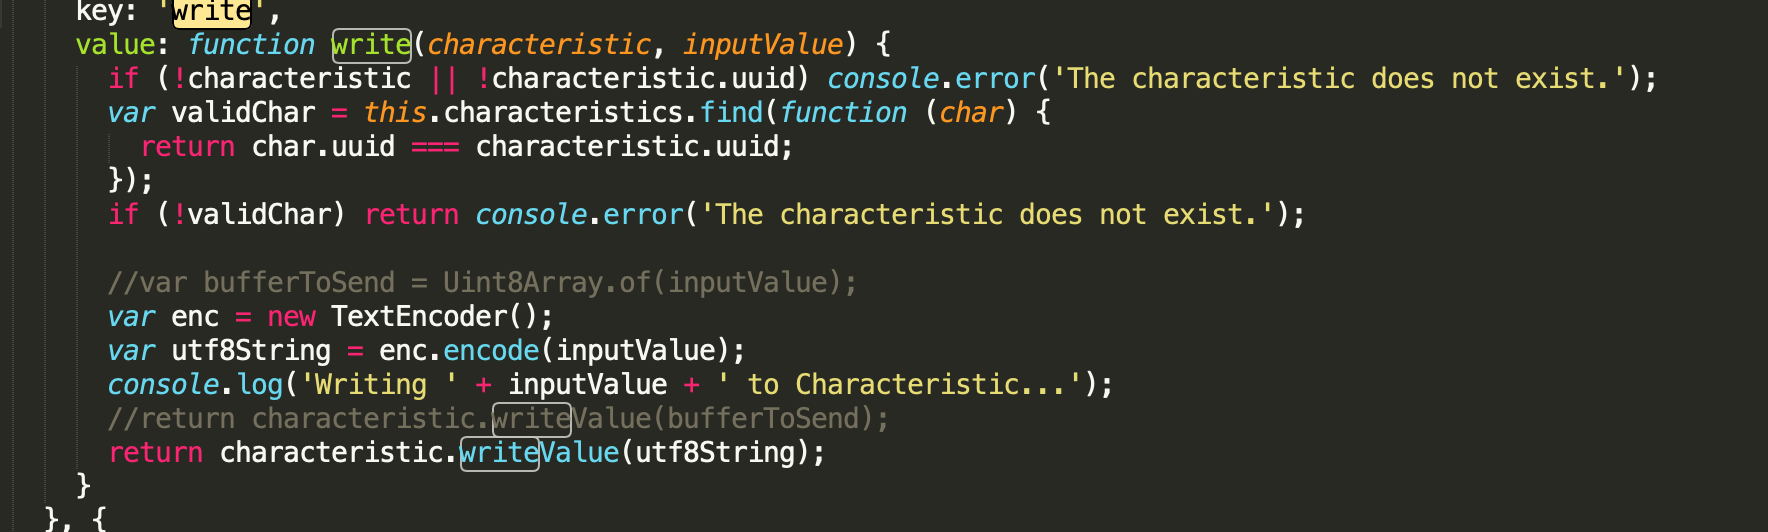
I had to download the p5.ble.js and p5.ble.js.map files and change the encoding in the write message. Strings can not be encoded with the Unit8Array.of method and the code was sending an empty array. I then had to include this updated library in the index.html page.
Assignment 4: Bluetooth Devices
This week I learned all about BLE (Bluetooth low energy) devices. I first downloaded the LightBlue scanner app and looked for all of the BLE devices broadcasting close to my apartment. There were a shocking number of devices, most of which were unnamed without any services attached to them. I am not quite sure what makes up the majority of these devices, there are literally over 100 of them.
I next created an arduino program that uses the ArduinoBLE library to scan for peripherals using the BLE.scan() function and then recorded the local name and UUID for each device that was found (that had a name) in an array that can be read using the Joystick and LCD screen.
Clicking the joystick starts scanning for devices, clicking it again stops the scan. The right and left joystick motions cycle through the found devices with names (5 in my apartment, two of which show up as an empty name because I use emojis to name my laptop and computer). Pressing down on the joystick shows the UUID of the device.

I then worked on creating a website that acts as a central which can talk to an arduino which is a peripheral advertising a service that allows you to turn the onboard led on and off. I started by uploading the arduino code that is available on the ble lab webiste, and confirmed that I could turn the led on and off with my phone using the LightBlue application. I then rewrote the p5 code as plain html / css / javascript with onclick functions that allow you to first connect with the arduino peripheral (requires browser confirmation popup that makes you select “LED”. If the connection is successful, a new div appears with a text input and button that allows you to send a 1 or 0 to the arduino triggering the onboard LED to turn on and off. The code is available here.
Assignment 3: Arduino HID Control + LCD Joystick Status
This week I created a joystick keyboard controller on the arduino that shows the joystick and HID status on an LCD screen. The code reads the joystick button and if clicked, turns on a keyboard (and turns the keyboard off if clicked again). There is a 1 second delay after the HID status changes to prevent bouncing the status back and forth. When the HID keyboard is enabled, the joystick X and Y (-1 Or 1) sends LEFT, RIGHT, UP, and DOWN keyboard commands. The LCD display shows the X and Y value, the button status (off or clicked) and the HID status (On or Off).
I noticed that the rate at which the commands are sent cause the cursor to move far faster in the arduino IDE than if the arrow keys from the normal keyboard are pressed. When I tried controlling the lunar lander browser app I noticed the opposite that the lander could be moved from side to side (slowly) but the up button would not cause the lander to increase the rate of propulsion.
After reading the arduino library, I realized that it was incorrect to use keyboard.write when trying to emulate a joystick controller. The correct implementation is using keyboard.press(<key>) while the joystick is activated in any direction and then to use keyboard.release(<key>) when it is in the center. It appears that both the IDE and lunar landing game have their own internal logic as to how fast the cursor can move when a key is pressed vs how fast it can accept new presses (keyboard.write). The lunar lander does not work with write because it listens for the up key being held down to increase upwards propulsion. No matter how quickly you press the up key if you are not holding it down, it will always reset the amount of upwards propulsion to the minimum causing the game to be impossible to play.
Assignment 2: QR Codes and Responsive Design
This week I created a browser based application that is hosted on github that uses responsive design to display differently on mobile vs the browser (unless the browser is very small). The index.html links to a qrcode generator library, sets the viewport metadata tag so the page can be displayed differently on mobile, and has a couple messages and a qr code div on the page. In the script.js file, once the listener for DOMContentLoaded is hit, I create a QR code with the url of the current page (window.location.href) and display it on the page. If you scan the qr code on mobile, the css for a screen under 600 pixels is activated which hides the qr code, changes the page background to light blue, and displays a message telling you that the qr code is hidden because you are now on mobile. Code available here.


After I set up the website, I tried to implement the QR code generator on the arduino using toms SSSD1306 code. I was able to get the qr code to display but my phone could not focus well enough to see it. I also changed the QR code size to 1 which my phone seemed to recognize as a qr code (adding the white box around it on the iphone) but no link popped up.
I am not sure if this is due to the code not being big enough to contain the website string or that the phone could register the code but not read the details because the pixels are too small. Additionally, I noticed an aliasing effect while viewing the screen through the camera and am not sure if that is related to not being able to scan it.

Assignment 1 : Browser based application with serial control from microcontroller
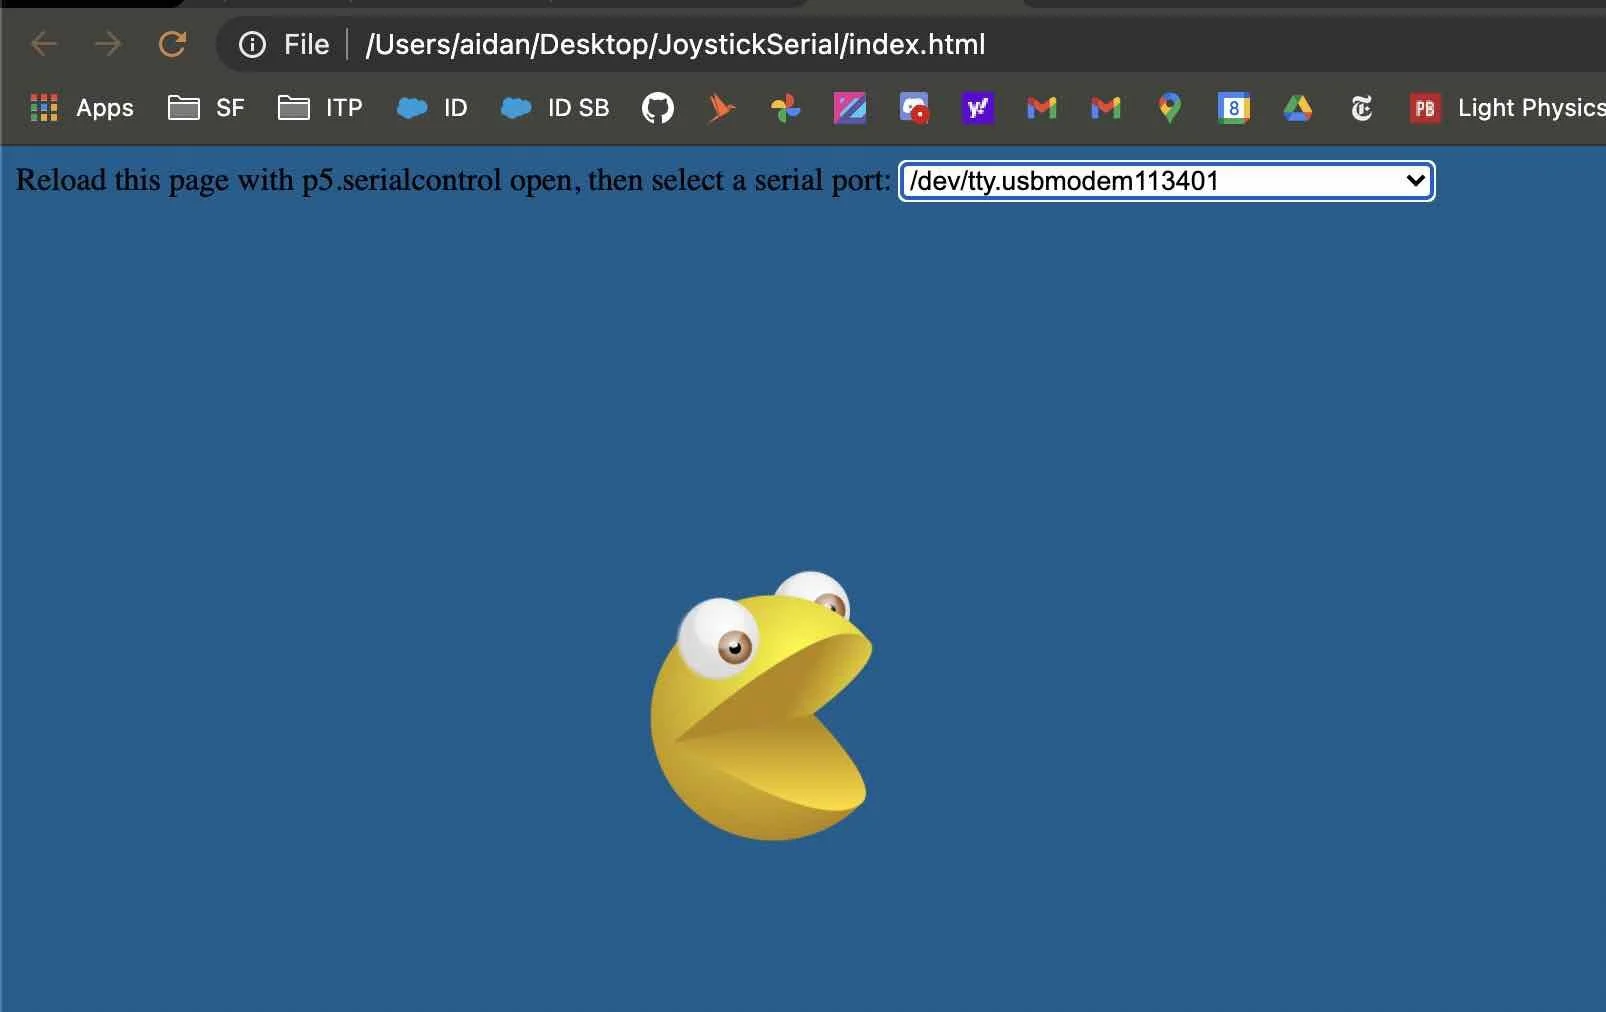
This week I created a basic browser application which receives input from an arduino. The website has a dropdown menu that is connected to p5 serial control. You select the port that you want to listen which allows the browser to listen for the serial data that the arduino is sending. The arduino is connected to a joystick which is read through the analog pins (x and y direction) and a digital pin (the joystick button press). This information is packaged into a json object and sent through the serial line. The browser app which uses the p5 serial library has an event listener for serial data, when this data comes in, the app checks for a button state which when changes from 0 to 1, triggers the background of the website to change colors. When the x and y data from the joystick changes, an image of pacman is moved around the screen accordingly.